Getting Started
This guide takes you from zero to a working Excel report in about 5 minutes.
Install
Section titled “Install”go get github.com/javajack/xlfillRequires Go 1.24+. Only .xlsx files are supported.
Step 1: Create your template
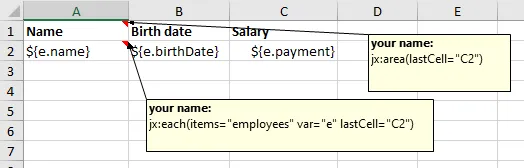
Section titled “Step 1: Create your template”Open Excel, Google Sheets, or LibreOffice Calc. Create a new file and set it up like this:
Here’s what to do:
- Format the header row — bold text, background color, borders, whatever you like
- In the data row, put expressions:
${e.Name}in A2,${e.Age}in B2,${e.Payment}in C2 - Right-click cell A1 and add a cell comment with this text:
jx:area(lastCell="C2")jx:each(items="employees" var="e" lastCell="C2")
- Save as
template.xlsx
That comment tells XLFill: “The template region is A1:C2. Repeat row 2 for each item in the employees list, using e as the loop variable.”
How to add cell comments in your spreadsheet editor
Section titled “How to add cell comments in your spreadsheet editor”Cell comments are the mechanism XLFill uses to read commands. Here’s how to add them in the most popular tools:
Microsoft Excel
Section titled “Microsoft Excel”- Right-click the cell (e.g., A1)
- Select Insert Comment (or New Note in Excel 365)
- Type your commands, one per line:
jx:area(lastCell="C2")jx:each(items="employees" var="e" lastCell="C2")
- Click outside the comment to close it
Google Sheets
Section titled “Google Sheets”- Right-click the cell
- Select Insert note (not “Insert comment” — that creates a threaded discussion)
- Type your commands and click outside to save
- Important: When done, download as Microsoft Excel (.xlsx) via File > Download. XLFill only reads
.xlsxfiles.
LibreOffice Calc
Section titled “LibreOffice Calc”- Right-click the cell
- Select Insert Comment
- Type your commands in the yellow comment box
- Click outside to close
- Save as
.xlsxformat (File > Save As > select “Microsoft Excel 2007-365 (.xlsx)“)
WPS Office Spreadsheet
Section titled “WPS Office Spreadsheet”- Right-click the cell
- Select Insert Comment
- Type your commands in the comment box
- Click outside to close
- Ensure you save as
.xlsxformat
Quick verification
Section titled “Quick verification”After adding comments, you should see a small red triangle in the top-right corner of the cell (in most editors). Hover over the cell to verify your comment text is correct. That’s all XLFill needs to find your commands.
Step 2: Write Go code
Section titled “Step 2: Write Go code”package main
import ( "fmt" "github.com/javajack/xlfill")
func main() { data := map[string]any{ "employees": []map[string]any{ {"Name": "Elsa", "Age": 28, "Payment": 1500}, {"Name": "Oleg", "Age": 32, "Payment": 2300}, {"Name": "Neil", "Age": 34, "Payment": 2500}, {"Name": "Maria", "Age": 25, "Payment": 1700}, {"Name": "John", "Age": 35, "Payment": 2800}, }, }
err := xlfill.Fill("template.xlsx", "output.xlsx", data) if err != nil { fmt.Println("Error:", err) return } fmt.Println("Done! Open output.xlsx")}Step 3: Run it
Section titled “Step 3: Run it”go run main.goOpen output.xlsx:
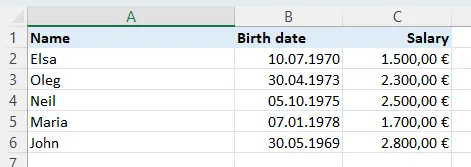
Five rows of data, all formatting preserved from the template. The header stayed put, the borders carried over, the number formats are intact. No code for any of that.
Using Go structs
Section titled “Using Go structs”Maps work, but so do structs — use whatever fits your application:
type Employee struct {    Name    string    Age     int    Payment float64}
data := map[string]any{    "employees": []Employee{        {Name: "Elsa", Age: 28, Payment: 1500},        {Name: "Oleg", Age: 32, Payment: 2300},    },}
xlfill.Fill("template.xlsx", "output.xlsx", data)
Field names in expressions (${e.Name}) match struct field names.
Serving from an HTTP handler
Section titled “Serving from an HTTP handler”For web applications, use FillReader or FillBytes:
func reportHandler(w http.ResponseWriter, r *http.Request) {    data := fetchReportData()
    w.Header().Set("Content-Type",        "application/vnd.openxmlformats-officedocument.spreadsheetml.sheet")    w.Header().Set("Content-Disposition",        "attachment; filename=report.xlsx")
    tmpl, _ := os.Open("template.xlsx")    defer tmpl.Close()
    xlfill.FillReader(tmpl, w, data)}
No temp files. The report streams directly to the HTTP response.
What just happened?
Section titled “What just happened?”Let’s recap the workflow:
- You designed a template visually in Excel — formatting, fonts, borders, all done in a spreadsheet editor
- You added two things to the template:
${...}expressions in cells and ajx:command in a cell comment - Your Go code provided data and called one function
- XLFill read the template, found the commands, looped over your data, evaluated the expressions, and wrote the output — preserving every visual detail
The template is the design. The code is just data. That’s the whole philosophy.
Next: understand how templates work
Section titled “Next: understand how templates work”Now that you’ve seen it in action, let’s look deeper at how templates are structured — what the jx:area command does, how nesting works, and how XLFill processes your template.