How Templates Work
Now that you’ve built your first report, let’s understand what XLFill actually does with your template.
The two building blocks
Section titled “The two building blocks”Every XLFill template uses just two things:
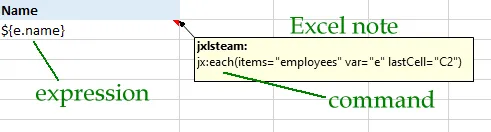
- Expressions — placed in cell values:
${e.Name},${price * qty} - Commands — placed in cell comments:
jx:each(...),jx:if(...)
That’s the entire template language. Expressions produce values. Commands control structure (loops, conditions, grids).
Understanding the work area
Section titled “Understanding the work area”The work area is the most important concept in XLFill. It answers the question: “Which part of my spreadsheet is a template, and which part is just static content?”
What the work area is
Section titled “What the work area is”When you write jx:area(lastCell="C2") in a comment on cell A1, you’re defining a rectangular region — A1 to C2 — as the work area. This is the region XLFill will process. Everything else on the sheet is left completely untouched.
A B C D E ┌──────────────────────────────────────┐1 │ ${e.Name} ${e.Age} ${e.Dept} │ ← Work area (A1:C2)2 │ (data row) (data row) (data row) │ XLFill processes this └──────────────────────────────────────┘3 Notes here Logo ... ← Outside the area4 Static text Static ... XLFill ignores thisWhy the work area matters
Section titled “Why the work area matters”- Cells inside the area are processed: expressions are evaluated, commands are executed, rows may be inserted or removed
- Cells outside the area are preserved exactly as-is — they pass through to the output unchanged
- This lets you have static content (company logos, instructions, disclaimers) on the same sheet as your dynamic template
The work area grows dynamically
Section titled “The work area grows dynamically”Here’s a subtle but powerful point: the work area has a template size (what you defined) and an output size (what actually gets produced).
If your area is A1:C2 (2 rows) and your jx:each loops over 100 employees, the output is 101 rows (1 header + 100 data rows). The area expands to accommodate the data. You don’t need to predict how large the output will be — XLFill handles it.
Template area: A1:C2 (2 rows) → Output: A1:C101 (101 rows) ┌─────────────┐ ┌─────────────┐ A1 │ Header │ A1 │ Header │ A2 │ ${e.Name} │ A2 │ Alice │ └─────────────┘ A3 │ Bob │ ... │ ... │ A101 │ Employee100 │ └─────────────┘Conversely, if a jx:if condition is false, its area is removed and the output shrinks. The work area adapts to the data.
Every command has its own area
Section titled “Every command has its own area”It’s not just jx:area that has a region — every command defines its own rectangular area via lastCell. XLFill builds a hierarchy:
- The root
jx:areais the outermost boundary - Each
jx:each,jx:if, etc. defines a sub-area within it - Commands whose areas are strictly inside another command become children of that command
- XLFill detects this nesting automatically from cell positions — you never declare it explicitly
This hierarchy is what makes nested loops, conditional sections, and complex layouts possible without any special syntax.
How XLFill processes a template
Section titled “How XLFill processes a template”When you call xlfill.Fill(...), here’s what happens step by step:
1. Parse comments
Section titled “1. Parse comments”XLFill scans every cell comment looking for jx: commands. It builds a tree of commands based on their areas — which commands contain which other commands.
2. Define the working area
Section titled “2. Define the working area”The jx:area(lastCell="...") command on the top-left cell establishes the processing boundary. Everything outside this area is left untouched.
3. Execute commands top-down
Section titled “3. Execute commands top-down”Starting from the outermost command, XLFill executes each one:
jx:eachcopies its template rows for each item in a collection, expanding the outputjx:ifincludes or skips its area based on a condition, potentially shrinking the output- Nested commands are executed within their parent’s context, inheriting the parent’s loop variables
4. Evaluate expressions
Section titled “4. Evaluate expressions”For each cell in a command’s area, XLFill replaces ${...} expressions with values from the current data context. Inside a jx:each loop, ${e.Name} resolves to the current item’s Name field.
5. Preserve everything else
Section titled “5. Preserve everything else”Styles, fonts, borders, number formats, merged cells, row heights, column widths — all copied from the template to the output without any special effort from you.
A concrete example
Section titled “A concrete example”Here’s a template with a formatted header and a data row:
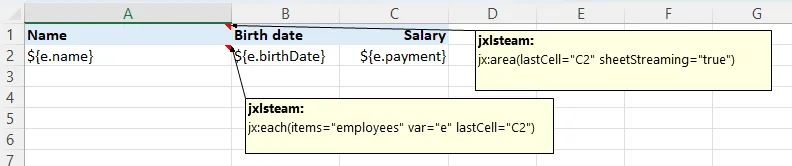
The comment on the top-left cell says:
jx:area(lastCell="C2")jx:each(items="employees" var="e" lastCell="C2")When XLFill processes this:
- It finds the area: A1:C2
- It finds the
jx:eachcommand: loop overemployees, call each onee, repeat the area A1:C2 - Row 1 (the header) is above the data row, so it appears once
- Row 2 (with
${e.name}, etc.) is repeated for each employee - All formatting from both rows is preserved
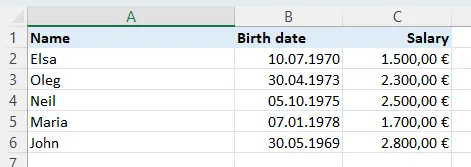
Result:
How nesting works
Section titled “How nesting works”Commands can be nested. An inner command’s area must be strictly within its parent’s area. XLFill detects this automatically.
Example: departments with employees inside each:
Cell A1 comment:  jx:area(lastCell="C5")  jx:each(items="departments" var="dept" lastCell="C5")
Cell A2 comment: jx:each(items="dept.Employees" var="e" lastCell="C2")| Row | A | B | C |
|---|---|---|---|
| 1 | ${dept.Name} | ||
| 2 | ${e.Name} | ${e.Age} | ${e.Role} |
The outer loop produces one section per department. Within each section, the inner loop produces one row per employee. The department name row appears once per department, the employee rows repeat.
What “template-first” means in practice
Section titled “What “template-first” means in practice”The template-first approach has a key consequence: the template file is the single source of truth for layout and formatting. Your Go code never mentions fonts, colors, column widths, or cell styles. It only provides data.
This means:
- A business analyst can change the report design without touching code
- A developer can change the data source without touching the template
- You can test the layout by opening the template in Excel — what you see is what you get
What’s next?
Section titled “What’s next?”Now you understand the mechanics. Let’s explore what you can put in those ${...} expressions — arithmetic, field access, ternary operators, and more.